I have recently re-visited my builds of a dropbox I use for remotely testing internal networks, and I found great success in going back and rebuilding these devices from the ground up. When I was first setting up these devices, I didn’t find a lot of great resources to help from an end-to-end perspective, and so I decided to put something together to help others that may want to build something similar.
What is a dropbox and why do you want one?
These are small devices used by penetration testers to perform penetration testing against an internal network. I use mine for internal network testing as well as Wi-Fi audits, i.e. aircrack-ng and kismet . There are a lot of alternatives, of course, everything from implants from Hak5 (like the Packet Squirrel ), to physical access to the network via site visits. Likely the most common is using a VPN to connect to the network.
When it comes to Wi-Fi audits, being able to test remotely is what drove the original design of our dropbox. Not all our customers are located close enough that a physical visit is viable, so having an alternative is nice to have. Plus it’s nice to build something yourself, which embodies the hacker culture and philosophy, so hopefully this guide satisfies your curiosity.
Building your own device is truly embracing hacker culture, so our hope is that you find this enlightening and a first step in your own hacking journey (for legal reasons, of course)!
Requirements
Since this device is going to be used for finding weaknesses within a company’s internal network, we have a few requirements:
-
Secure By Default - we do not want to expose this device publicly and introduce weaknesses to our customer, so ensuring that it is secure by default is important.
-
Cost Effective - Spending a few hundred dollars on a device isn’t practical. We want something simple and inexpensive that can easily be replaced.
-
Easy To Deploy - We want something that a client can just plug in and go, no need to manually log in and start services.
-
Functional - Penetration testers require a number of different tools, so ensuring we have something that meets most needs our of the box is a bonus.
-
Wi-Fi Support - Being able to audit and/or monitor Wi-Fi networks is a great bonus, so finding something that supports monitor mode would expand supported services.
These are the main requirements for the dropbox. There may be more specific requirements that others may have, but for us at EliteSec, these are the main points we were trying to cover.
Build List
So what do we need? Let’s break this down into hardware and software, as we’ll need both.
Hardware
-
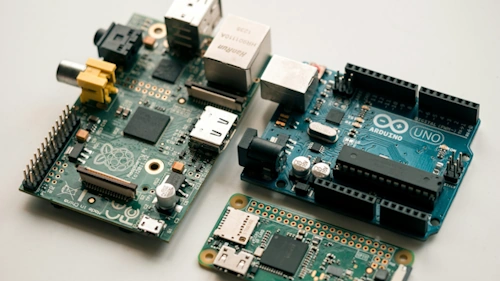
Raspberry Pi 4B with 4GB of RAM Can also go with a Raspberry Pi 5, but I’m fine with the lower-cost option Same thing with the RAM, you can go bigger, but the benefits aren’t worth it in my opinion
-
Can also go with a Raspberry Pi 5, but I’m fine with the lower-cost option
-
Same thing with the RAM, you can go bigger, but the benefits aren’t worth it in my opinion
-
64 GB microSD card
-
Raspberry Pi Case I’m a fan of this one: Geekworm for Raspberry Pi 4 Case
-
I’m a fan of this one: Geekworm for Raspberry Pi 4 Case
-
BrosTrend 650Mbps Linux WiFi Adapter I have used a different adapter in the past, but I find the BrosTrend to be more reliable, plus it has a superior antenna.
-
I have used a different adapter in the past, but I find the BrosTrend to be more reliable, plus it has a superior antenna.
-
USB power supply A proper plug-in model, not a power bank as this may be running for a few days. You could go with a PoE hat, but that would require a different case (and a client that has equipment that supports PoE)
-
A proper plug-in model, not a power bank as this may be running for a few days.
-
You could go with a PoE hat, but that would require a different case (and a client that has equipment that supports PoE)
-
MicroSD card reader To help with flashing the OS to the microSD card
-
To help with flashing the OS to the microSD card
-
(Optional) HDMI-to-micro HDMI cable/adapter
-
(Optional) USB keyboard and mouse Useful if you want to do a local setup of the Pi
-
Useful if you want to do a local setup of the Pi
Software
-
balenaEtcher Great method for flashing the OS to the microSD card.
-
Great method for flashing the OS to the microSD card.
-
Kali Linux for Raspberry Pi
-
BrosTrend Wi-Fi driver
-
Tailscale linux client
Aside from grabbing the drivers for the Wi-Fi adapter, the major upgrade is using Tailscale for the VPN connection. I love Tailscale, and it has greatly simplified the building of these devices. Go and sign up for a free account if you haven’t yet done so.
Essentially, with Tailscale you can build a software-defined secure network using Wireguard, that you can secure with OAuth providers like Google, Microsoft, etc, to simplify user logins. Not only that, you can use their own DNS services (called Magic DNS) to access nodes by name, including your newly minted dropbox. Did I also mention it’s free? Yep, their free tier gives you up to 3 named users and 100 devices at no cost. Even their paid tiers are reasonable for what they offer, but of course your mileage may vary. You can always try to setup your own OpenVPN or Wireguard configurations, but those can be a major pain and do incur additional costs in the form of a dedicated VPS for a server.
I’ll touch on Tailscale a bit more when we get to some of the configuration steps next.
As for Kali, I’m just going with what works. After spending a few years on ParrotSec , I’ve run into more and more problems lately, so I’ve gone back to Kali and I couldn’t be happier. From some outdated packages, to broken networking, Parrot just betrayed me. When it died on me at the start of an engagement after installing a new package that I needed, I decide to switch and I haven’t looked back. It also has everything I need out of the box for this type of device, so I feel it’s a solid choice. To each their own though, so feel free to experiment with other distributions. I mean, it’s not like I’m offering support here.
Setup
I’m going to assume you know how to flash the microSD card with Kali and know how to log in once you’ve setup the initial device. Personally I like hooking the Pi up to a local monitor, keyboard, and mouse, but I’m lazy.
The Pi does have a built-in Wi-Fi adapter, which is fine to use for the initial setup. such as downloading updates, drivers, and the Tailscale client installer. I go in the following order:
-
Change the default password: passwd
-
Disable SSH on the instance: sudo systemctl stop ssh; sudo systemctl disable ssh
-
Update the OS and related packages: sudo apt update ; sudo apt upgrade -y ; sudo apt autoremove -y
-
Edit /etc/hostname and /etc/hosts to give a proper hostname for the device, i.e. drop-box-1 or similar
-
Reboot
-
Install the USB Wi-Fi drivers: sh -c ‘wget linux.brostrend.com/install -O /tmp/install && sh /tmp/install’
-
Install the Tailscale Linux client: curl -fsSL https://tailscale.com/install.sh | sh
-
Start Tailscale with Tailscale SSH enabled: sudo tailscale up —ssh
-
Clear any local Wi-Fi network configurations
-
Clear browser history, saved logins, or OAuth sessions from the device
That’s pretty much it! SSH is disabled above because you can use Tailscale SSH to connect to the dropbox from any Tailscale node, such as your local machine. Very handy, and quite convenient. Read more about it here .
Feel free to create a script, recipe, or playbook for bash, Chef, or Ansible as you see fit. Repeatability is a good idea, especially if you want to have a collection of these devices.
Post Install
Feel free to continue to harden the OS as you see fit, such as enabling auto-update, rolling of log files, enabling console logging via script in the .zshrc file, use a custom tmux config, etc. The only non-Kali step worth considering is to disable key expiry for the node on the Tailscale admin console:
-
Find the node on the Tailscale Admin Console
-
Click on the … for the node
-
Click on the Disable Key Expiry menu item
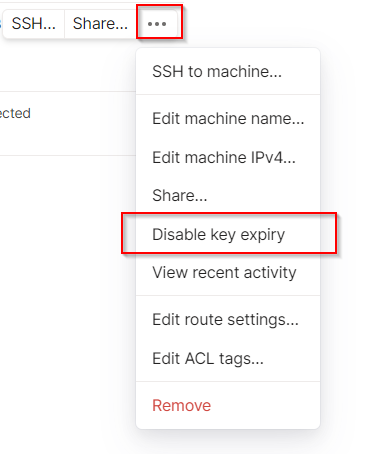
This way you will not need to perform any additional authentication steps to get the dropbox to connect to Tailscale after deploying it at a client site.
Deploy
After shipping/delivering the device to the client location, deployment is straightforward
-
Install the USB Wi-Fi adapter
-
Plug in an Ethernet cable to the Raspberry Pi, connected to the local network
-
Plug in the USB power adapter
-
Connect to the device remotely using Tailscale SSH
Because the dropbox is using a wired ethernet connection, you should be able to perform your network scans, etc., without issue. You may need to use Tailscale subnet routing if you run into difficulty, which you can read up on here . Basically you can use the dropbox to act as a tunnel to the rest of the internal network from any other node in the Tailscale network.
Aside from that, you can use tools like aircrack-ng , kismet , etc. for Wi-Fi security auditing, nmap et al for scanning, or whatever tools you may need for your testing.
Conclusion
Having a dropbox can make a world of difference for a penetration tester or red teamer. Whether explicitly placed or hidden under a desk, having something on the inside of a secure network definitely has its advantages. I find the concept of a dropbox to be incredibly useful, and I wrote this article as a way to help others build their own in a rather simple way. This is just the bare minimum to set something up, make sure to customize your own to lock it down further and customize to your own liking.
Hopefully you found this helpful, especially if you are looking to build your own dropbox for your own deployments. This is an incredibly simple solution and one that has loads of possibilities. Red team engagements that need a simple implant, pen testers looking for remote access, remote wi-fi assessments, etc. Please use this knowledge for legal activities only, and don’t be cruel. This post is for informational purposes only and we offer no warrantee (implied or explicit) on these instructions.
Thanks for reading, and good luck with future engagements!
If you are looking for a penetration testing partner to help test your own security, please contact us ! We would love to chat and discuss your unique needs. See how EliteSec can assist you today!